Syntheogen Guide
Track Effects
Updated October 29, 2014
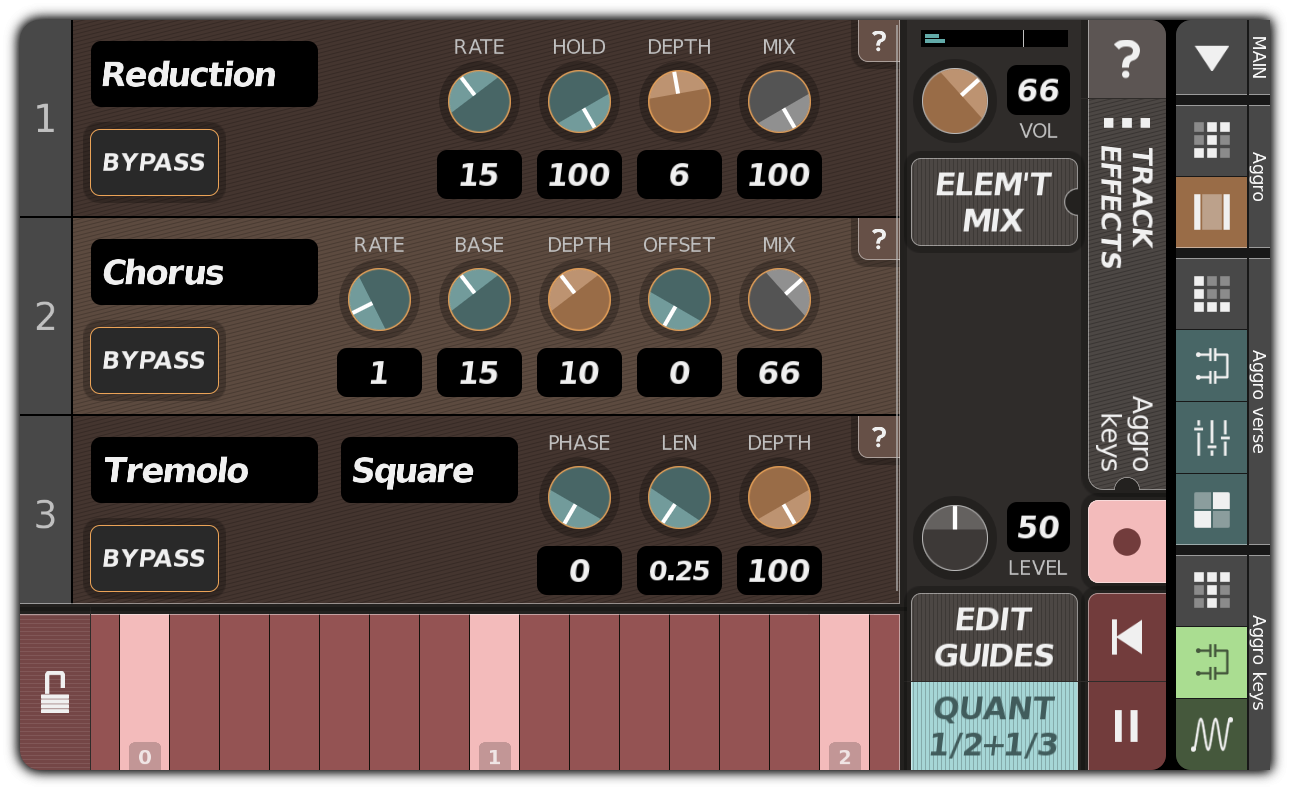
The TRACK EFFECTS dialog is used to edit the effect settings for a particular track:

TRACK EFFECTS dialog
Unlike the LOOP EFFECTS dialog, which applies effects to all tracks in the loop, the effects here apply only to the track named in the title bar. This provides more flexibility, but placing numerous effects on multiple tracks may also consume more of your device's resources.
Effects view
The view on the left shows all the effects applied to the current track. The effect at the top is the first to process the synthesized sound; its output becomes the input for the second effect, that effect's output is passed to the third, and so on. When you first create a track, the effects view will be empty, allowing unprocessed synthesis output to be heard.
Every effects panel has these controls on its left side:
| (type) | Sets the type of this effect instance. Syntheogen offers clipping, reduction, flanger, chorus, filter, comb filter, tremolo, delay, and reverb effects, with others on the way. |
| BYPASS | Sets or unsets the bypass flag, which temporarily disables this effect instance. |
Other controls are specific to the effect type.
Keyboard view
The keyboard can be used to record patterns in this track, or simply to test the sound of the patch. Ten full octaves are displayed by the keyboard; to reach higher or lower notes, hold the UNLOCK button and drag left or right. To resize the keys, hold UNLOCK and pinch.
Only notes from the current scale are displayed in the keyboard. To change the scale, open the TRACK PROPERTIES dialog by tapping the title bar on this dialog.
Command buttons
Normally, the following buttons are displayed:
| ELEMENT MIX | Displays the ELEMENT MIX dialog, which allows you to change the PAN, LEVEL, MUTE, and SOLO settings for the loop element from which this track was edited. |
| PASTE EFFECT | Displays the PASTE EFFECT dialog, allowing you to add an effect to the track. If you copied an effect before pasting, that effect's settings will be applied when the effect is created; otherwise, default settings will be used. The new effect can be pasted above, below, or over the selected effect. |
| COPY EFFECT | Copies the selected effect. To use this button, you must first select an effect by tapping its background. |
| DELETE EFFECT | Deletes the selected effect. As with the COPY button, you must first select an effect by tapping its background. |
| EXPORT PATCH | Opens the DESTINATION PATCH dialog, allowing you to copy the synthesis settings, effects, or both from this track to another track. |
| IMPORT PATCH | Opens the SOURCE PATCH dialog, allowing you to copy the synthesis settings, effects, or both from a preset patch or another track to this track. Italicized entries in the dialog represent preset patches, which cannot be edited. |
Recording keyboard input
If the RECORD button is lit, and playback is started, notes played on the keyboard will be recorded into the pattern. If a pre-existing note has the same pitch as a recorded note, and if more than half the pre-existing note is overlapped by the recorded note, the pre-existing note will be deleted.
TRACK EFFECTS dialog with recording enabled
When the RECORD button is lit, several new controls appear:
| LEVEL | Sets the level to be applied when new steps are recorded. As explained elsewhere, steps are allowed to have zero levels. |
| EDIT GUIDES | Displays the GUIDES dialog, which you can use to create, delete, or select the guides to which notes are quantized. |
| QUANT | Enables or disables quantization, which causes the start and end times of recorded notes to be fit to boundaries in the current guide. Notes can also quantized after recording by selecting a range in the LOOP STEPS dialog. |
Other controls
Above the command buttons you will see the VOL controls that appear on all loop and track edit dialogs.
To the far right is the title bar, which shows the name of the track being edited. Tapping the title bar opens the TRACK PROPERTIES dialog.
Below the title bar is the RESTART button, which starts or restarts playback from the beginning of the loop, and the PLAY button, which alternately starts and pauses playback.